Vivid Trace 1.1 Add-on Administration
This document discusses how to administer the Vivid Trace add-on for JIRA. This document covers the following topics:
- System Requirements and Compatibility
- Deployment Readiness Checklist
- Installing the Vivid Trace Add-On in JIRA
- Managing the Add-On
- Configuring the Add-On
- Getting Support
- Uninstalling the Add-On from JIRA
System Requirements and Compatibility
Refer to the Specifications for information on the supported editions and versions of Atlassian JIRA, including supported browsers and devices as well as integrations with third-party JIRA add-ons.
Deployment Readiness Checklist
You can use the following checklist to smooth deployment of Vivid Trace.
- Administrators of JIRA: Administrators know how to control enablement of, how to provision, and how to diagnose & remediate problems concerning Issue Types , Sub-Tasks , and Issue Linking , as well as how to associate them for use in projects. Administrators are aware of the Vivid Trace product documentation, are familiar with the Add-on Administration material & relevant Release Notes, and how to obtain product support from Vivid.
- JIRA: Your JIRA system satisfies Vivid Trace's System Requirements and Compatibility. Both the Issue Linking and Sub-Tasks features are enabled in JIRA, and the users of Vivid Trace have the necessary JIRA permissions to make use of both features. Tasks, Sub-Tasks, and Issue Link Types are provisioned in support your process needs, and are available in the desired projects through various schemas.
- Organizational Processes: Awareness of Vivid Trace's visualization and traceability capabilities is built among stakeholders, and processes are adapted to leverage these capabilities. Stakeholders have confirmed that the required issue types, sub-task types, and issue link types are available for use in projects as necessary.
- Users of JIRA: Users know the appropriate uses for each of the available issue types. Users are aware of the available sub-tasks, and are familiar with the features associated with them. Users know how to use issue links appropriately, can differentiate between the available types of issue links, and are cognizant of the potential impact that errors in issue link direction can have on decision making (For example, "blocks" versus "is blocked by"). Devices and web browsers used to interact with JIRA satisfy Vivid Trace's System Requirements and Compatibility.
- Vivid Trace Add-on: Vivid Trace is installed in JIRA, is properly licensed, and is up to date. The Vivid Trace add-on configuration doesn't report any errors.
- Optional: Other JIRA add-ons are also correctly deployed, such as JIRA Agile and Zephyr for JIRA, that provide their own Task, Sub-Task, and/or Issue Link Types to more richly support your processes.
Installing the Vivid Trace Add-On in JIRA
Vivid Trace is packaged as an add-on for JIRA and is distributed through the Atlassian Marketplace. Use the following procedure to install the Vivid Trace add-on in JIRA.
- Ensure you are logged in to JIRA with System Administrator permissions.
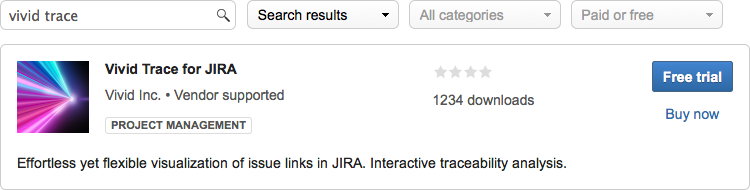
- Navigate to the "Find new add-ons" administration page within JIRA.
- Search the marketplace for
Vivid Trace, and when you have identified Vivid Trace in the search results, click either "Free trial" to begin a new trial or "Buy now" to purchase a license. Vivid Trace begins to download. - After logging into to MyAtlassian, enter your information and click "Generate license" followed by "Apply license." If you're using an older version of UPM, you can copy and paste the license key into your JIRA instance.
Install Vivid Trace by selecting either "Free trial" or "Buy now" and following the directions.
Vivid Trace is ready for use when registered with a valid license. Licenses are obtained through the Atlassian Marketplace as part of the free trial and purchasing processes. For more information on installation, refer to Installing add-ons in the JIRA documentation.
Managing the Add-On
Add-on licensing and version information can be confirmed in Add-on Management. Also, operations that affect the add-on as a whole can be performed here. Use the following procedure to access the add-on management page.
- Ensure you are logged in to JIRA with System Administrator permissions.
- Navigate to the "Manage add-ons" administration page within JIRA.
- Expand the Vivid Trace entry within the list of User-installed add-ons.
Configure Vivid Trace add-on settings.
Buy Vivid Trace directly from the Atlassian Marketplace. Appears when the add-on is not configured with a purchased license key.
Uninstall the add-on from your JIRA system.
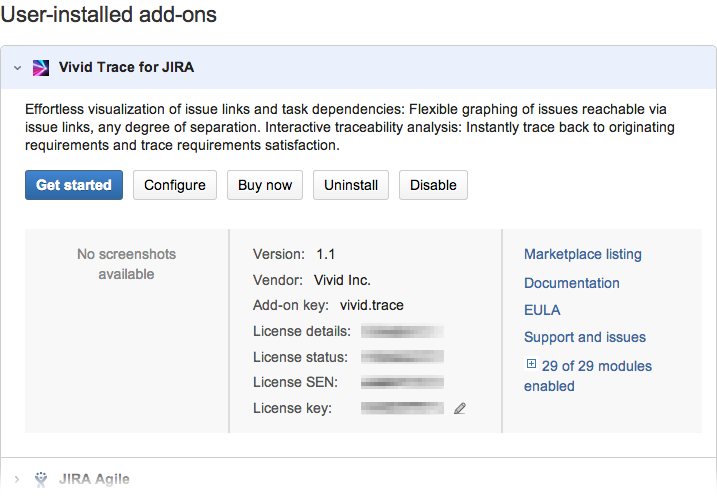
Confirm add-on and license details, and update the license key.
View the documentation set and support options.
For more information on handling add-ons, refer to Viewing installed add-ons and Managing purchased add-ons in the JIRA documentation.
Updating the Add-On
If a newer version of the Vivid Trace add-on is available on the Atlassian Marketplace, the add-on management user interface will highlight that fact and feature an "Update" button that allows you to perform the add-on update process directly in your JIRA system. After the add-on update process finishes, the new release will be immediately available to all users.
Although the process of updating the add-on itself is a matter of pressing the "Update" button, Vivid strongly advises that you first carefully confirm the Release Notes to identify any issues that might impact your organization. If the proposed update to Vivid Trace is several releases newer than your installed version, please take care to also confirm the Release Notes of all intervening versions.
Confirm the nature of the proposed available, newer version.
Update the add-on directly within your JIRA system.

Identify the installed and available versions.
Configuring the Add-On
The Vivid Trace add-on can be configured from within JIRA's administration system. Use the following procedure to view the configuration settings.
- Ensure you are logged in to JIRA with System Administrator permissions.
- Navigate to the "Manage add-ons" administration page within JIRA.
- Expand the Vivid Trace entry within the list of User-installed add-ons.
- Click or tap the Configure button to view the add-on configuration page.
Pay heed to any errors and warnings that appear in the configuration page. These messages indicate conditions where add-on functionality is degraded or disabled, and need to be addressed before full functionality can be restored.
The following sub-sections explain Vivid Trace's configurable add-on settings.
Issue Count Soft Maximum
This is an advanced setting. If you are not certain that you understand the potentially deleterious effects of adjusting this setting, we recommend leaving this setting at its default of 1000.
The Issue Count Soft Maximum is a breaker-switch that limits the number of issues fetched and displayed in individual issue link graphs, balancing available compute power with the need to display issue link graphs in their entirety. This setting takes effect immediately whenever updated and affects all projects.
Technically, issue link graph computation resource utilization increases with the connectedness of issues. JIRA server infrastructure is used to compute issue link graphs, and web browsers are used to display the graphs. Given this combination of quantity of issues involved, compute power, and frequency of use, if you have a need to reduce computational resource intensiveness or are finding that issue link graphs are being unacceptably truncated, the Issue Count Soft Maximum can be adjusted as an interim solution.
Reducing the soft maximum increases the likelihood that issue link graphs will be truncated, presenting misleading and inconsistent information liable to negatively impact your organization's decision making processes. Extreme limits, such as 20, might nullify the value of issue link graphs altogether.
Indications that the Issue Count Soft Maximum may need to be decreased, as an interim solution:
- Computation becomes unacceptably resource intensive on your JIRA server infrastructure.
- Web browser performance drops to unacceptable levels when displaying issue link graphs. Possibly attributable to lesser computing resources (slower processors, constrained RAM, older software).
Solutions that address the root cause and enable the Issue Count Soft Maximum setting to be restored include:
- Investigating the need for issue link graphs of such magnitudes. For example, changing issue link graph settings in certain projects to trim down issue link graphs but still be effective in their use cases (potentially more so), and building awareness of the project settings feature among users.
- Using a faster web browser or upgrading its hardware.
- Scaling the computational resources of the JIRA server infrastructure.
The Issue Count Soft Maximum may need to be increased if graphs are being unacceptably truncated.
Direct Feedback
When enabled, the Direct Feedback feature allows users to provide product feedback directly to Vivid, giving you the benefits of customer co-created product improvements without burdening your organization. This feature is disabled by default, and must be manually enabled before it is made available for use. This feature is accessible while viewing any issue link graph. This feature is not a support channel; for more information on how to obtain support, please refer to Getting Support.
Each feedback is sent to Vivid as a computerized email message using your JIRA system's Outgoing Mail settings. Therefore, outgoing mail must be enabled and configured. While outgoing mail is unavailable, feedback emails are queued but not forwarded to Vivid. Depending on settings, messages from failed attempts to flush the mail queue might pollute the JIRA log files. Your networking configuration, such as firewall and email infrastructure, must also accommodate sending email through the Internet in order for feedback to reach Vivid. Feedback emails are sent to feedback@vivid-inc.net.
{
  "atlassianApplication" : {
    "buildInformation" : "5.2.11#854-sha1:ef00d61",
    "displayName"      : "JIRA"
  },
  "feedbackDescription" : "USER_PROVIDED",
  "feedbackTopic"       : "USER_PROVIDED",
  "sendersEmailAddress" : "USER_PROVIDED",
  "sendersName"         : "USER_PROVIDED",
  "vividPlugin"         : {
    "pluginKey" : "vivid.trace",
    "version"   : "1.1"
  }
}
Specimen of a computerized feedback message body sent to Vivid. Fields marked USER_PROVIDED are free-form inputs and people are at liberty to supply or withhold information in those fields. Also included is brief, non-identifying information about your JIRA system. You can verify that this specimen is representative of information egress by using network protocol analysis (a packet tracer) or by capturing and inspecting entire messages from within your email infrastructure.
At the moment of disabling Direct Feedback, people who are in the midst of filling out feedback forms will not be affected; they will still be able to submit their forms and the resulting feedback email messages will be queued. Similarly, feedback emails queued for delivery will be sent by your JIRA system normally.
Vivid only stores and uses feedback information for the purpose of improving our products and services. See our Privacy Notice as well as our Unsolicited Idea Submission Policy in the Terms of Use for more information on how we use the feedback data provided to us. Note that Vivid might contact people who supply their contact information in their feedback.
For more information on configuring outgoing mail in JIRA, refer to Configuring JIRA's SMTP Mail Server to Send Notifications in the JIRA documentation.
Getting Support
To view support options, you can visit Vivid Support directly, or starting in JIRA from the add-on management page follow the "Support and issues" link. Support via email is available to people who provide the add-on "License SEN" information as supplied by Atlassian and that we can verify. If you are planning on Help Desk or other people to directly contact Vivid Support, their support experience will be more efficient if that license information is shared with them so that they can include it in their support requests. The terms of support are fully detailed on the Vivid Support website.
Uninstalling the Add-On from JIRA
There is no product lock-in, only added value. If you no longer need the benefits of managing work at higher levels, visibility into your work processes, or effortless reporting, use the following procedure to uninstall the Vivid Trace add-on from JIRA.
- Ensure you are logged in to JIRA with System Administrator permissions.
- Navigate to the "Manage add-ons" administration page within JIRA.
- Expand the Vivid Trace entry within the list of User-installed add-ons.
- Click the Uninstall button and follow the directions to complete the uninstall process.
Vivid Trace can be easily reinstalled at a later time by following the installation instructions in this document. For more information, refer to Uninstalling add-ons in the JIRA documentation.