Vivid Trace 2025.1 Add-on Administration
This document discusses how to administer the Vivid Trace add-on for Atlassian Jira and Confluence, addressing the entire deployment lifecycle. A deployment of Vivid Trace consists of Vivid Trace for Jira installed on Atlassian Jira Data Center, and optionally Vivid Trace for Confluence installed on Atlassian Confluence Data Center. This document covers the following topics:
- System Requirements and Compatibility
- Deployment Readiness Checklist
- Installing the Add-On into Jira
- Accessing Add-On Management
- Licensing
- Configuring System-Level Settings
- Managing Trace Configurations
- Administration of Vivid Trace for Confluence Add-on Software
- Additional Languages
- Updating the Add-On
- Uninstalling the Add-On
- Backup and Restore
- Supplementary Topics
- Limitations and Security Considerations
- Getting Support
System Requirements and Compatibility
Refer to the Specifications for information on the supported editions, versions, and feature configurations of Atlassian Jira, including supported browsers and devices as well as integrations with third-party Jira add-ons.
Deployment Readiness Checklist
Use this checklist to streamline the process of introducing Vivid Trace into your organization. If you would like assistance, contact Vivid Support.
- Administrators of Jira Administrators know how to control enablement of and how to diagnose and remediate problems concerning Issue Types, Sub-Tasks, and Issue Linking, as well as how to configure them for use in projects. Administrators are aware of the Vivid Trace product documentation, are familiar with the Add-on Administration material and relevant Release Notes and how to obtain product support from Vivid.
- Jira System Your Jira system satisfies Vivid Trace's System Requirements and Compatibility. Both the Issue Linking and Sub-Tasks features are enabled in Jira according to your needs, and the users of Vivid Trace have the necessary Jira permissions to make use of these features. Issues and Issue Link Types are available in the desired projects in support of your process needs. Vivid Trace is installed in Jira, up to date, and properly licensed. Jira has been re-indexed. The Vivid Trace add-on configuration doesn't report any error conditions, and any warnings have been handled adequately. Additional Jira languages are installed as required by your team members. Jira site-level default settings are determined, particularly Visibility of Traces in Issue Detail Views. Optionally, other Jira add-ons are also correctly deployed, such as Jira Software and Zephyr for Jira, that provide their issue types and issue link types to more richly support your processes.
- Organizational Processes Stakeholders are aware of Vivid Trace's visualization and traceability capabilities, and processes are ready to start leveraging these capabilities. Stakeholders have confirmed that the required issue types, sub-task types, and issue link types are available for use in projects as necessary.
- Users of Jira Users know the appropriate uses for each of the issue types available in their projects. Users know how to use issue links appropriately, can differentiate between the available types of issue links, and are cognizant of the potential impact that errors in issue link direction can have on decision making (For example, "blocks" versus "is blocked by"). Devices and web browsers used to interact with Jira satisfy Vivid Trace's System Requirements and Compatibility.
Installing the Vivid Trace Add-On into Jira
Vivid Trace is packaged as an add-on for Jira. Two of the primary methods for installing the Vivid Trace add-on into Jira are detailed here:
- Installing the add-on through the Atlassian Marketplace, and
- Manually installing a specific version of the add-on software through File Upload.
Note that the method used to install the add-on is independent of how the add-on is licensed, as detailed in Licensing the Add-On.
Installing the Add-On Through the Atlassian Marketplace
Use the following procedure to install the Vivid Trace add-on software into Jira through the Atlassian Marketplace.
- Log in to Jira with System Administrator permissions.
- Navigate to the "Find new add-ons" administration page within Jira.
- Search the marketplace for
vivid trace, and identify Vivid Trace in the search results. - Select either "Free trial" or "Buy now" and follow the directions. Jira might prompt you for product licensing; see Licensing the Add-On for more information.
- Re-index Jira. If you wish to perform the re-index without disrupting Jira availability, choose Background Indexing.
Search for vivid trace in the Atlassian Marketplace.

Install Vivid Trace by selecting either "Free trial" or "Buy now" and following the directions.
After completing the installation procedure, Vivid Trace will need to be configured with a valid license. Vivid Trace is ready for use when the add-on software is installed, registered with a valid license, and Jira has been re-indexed.
Manually Installing a Specific Version of the Add-On using File Upload
Vivid Trace can also be installed by first downloading the Vivid Trace add-on software file and then uploading that file to Jira.
A previous version of Vivid Trace can be installed using this method. If you are installing a previous version with the intention of downgrading, please be aware of limitations associated with downgrading the add-on.
Use the following procedure to manually install a specific version of the add-on using file upload.
- Download the desired version of the Vivid Trace
JARorOBRfile from either Vivid Trace Downloads or from the Atlassian Marketplace Version History. Ensure that the version you download and install is compatible with your version of Jira. Some versions of Vivid Trace come in variations, each compatible with a single, specific major version of Jira. For example, ajira-10variant of the add-on software that will operate only on Jira systems whose major version is 10. - Confirm the file size and
SHAhashes of the downloaded file according to the information provided in Vivid Trace Downloads. - Log in to Jira with System Administrator permissions.
- Navigate to the "Manage add-ons" administration page within Jira.
- Click "Upload add-on" and follow the prompts to select the downloaded add-on file and upload it into Jira for installation. You might need to re-enable plugin upload on your Jira instance.
- Jira might prompt you for product licensing; see Licensing the Add-On for more information.
- Re-index Jira. If you wish to perform the re-index without disrupting Jira availability, choose Background Indexing.

After obtaining the desired version of the add-on file, upload Vivid Trace into Jira by selecting "Upload add-on" and following the prompts.
After completing the installation procedure, Vivid Trace will need to be configured with a valid license. Vivid Trace is ready for use when the add-on software is installed, registered with a valid license, and Jira has been re-indexed. For more information on the File Upload method of installation, refer to Installing an app from a file in the Jira documentation.
Accessing Add-On Management
Operations that affect the add-on as a whole can be performed in Add-On Management. Use the following procedure to access the add-on's management page.
- Log in to Jira with System Administrator permissions.
- Navigate to the "Manage add-ons" administration page within Jira.
- Expand the Vivid Trace entry within the list of User-installed add-ons.
Examine the nature of the proposed update, if available.
Identify the installed version of the add-on, and the newest available version that is compatible with your Jira system, if available.
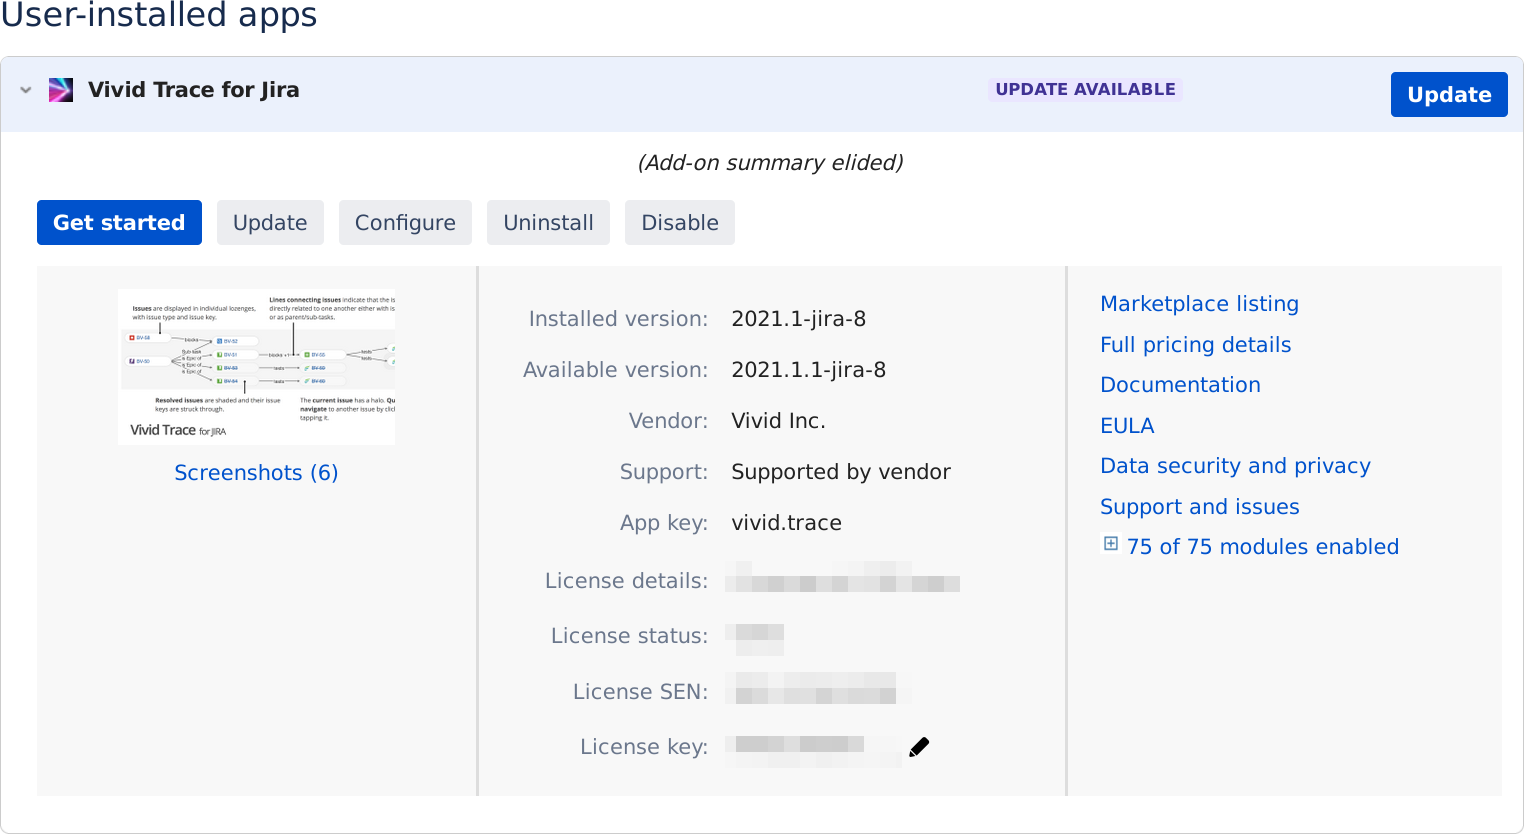
When Vivid Trace is configured with an Atlassian Marketplace-issued license, confirm license details here.
| Buy now | Buy Vivid Trace directly from the Atlassian Marketplace. Appears when the add-on is not configured with a license issued by the Atlassian Marketplace. For more information, see Vivid Trace License Purchasing Options. |
|---|---|
| Configure | Navigate to the add-on configuration page. |
| Privacy Notice | View the Privacy Notice. |
| Documentation | View the product documentation. |
| Marketplace listing | View the Vivid Trace product listing on the Atlassian Marketplace. |
| Modules | List of modules in the add-on. |
| Support and issues | See the support information for Vivid Trace registered with the Atlassian Marketplace. This information echoes some of the information available at Vivid Support. |
| Uninstall | Uninstall the add-on from your Jira system. |
| Update | Update the add-on directly within your Jira system. Appears when a newer version of Vivid Trace than the one installed in your Jira system is available. |
| Watch add-on | Subscription to receive immediate notifications from the Atlassian Marketplace concerning new releases of the add-on. |
For more information on handling add-ons, refer to Viewing installed apps and Managing purchased add-ons in the Jira documentation.
Licensing
A valid license is required to fully activate Vivid Trace. Licenses are issued by Vivid and Vivid Partners and by the Atlassian Marketplace as part of the free trial and purchasing processes. Note that the method for licensing the add-on depends upon the license issuer, and is independent of the method used to install the add-on. For information on licensing terms including pricing, entitlements, special terms for non-profit organizations (NPOs), and the satisfaction guarantee, see See purchasing options.
License management tasks:
- Start a Free Trial During Installation
- Managing a License Issued by Vivid or a Vivid Partner
- Managing a License Issued by the Atlassian Marketplace
Start a Free Trial During Installation
To install Vivid Trace and start a free trial, use the following procedure.
- If you haven't already, start installing Vivid Trace by clicking the Free trial button in the add-on search results. Vivid Trace begins to download and install.
- Wait for the download and install process to finish.
- Log in with your Atlassian account if prompted.
After installation finishes and you are logged in with your Atlassian account, Vivid Trace will be automatically registered in your Jira system with a free trial license issued by the Atlassian Marketplace.
Managing a License Issued by Vivid or a Vivid Partner
If your license is issued by Vivid or a Vivid Partner, then this section applies to you. Furthermore, if Vivid Trace is licensed then no matter the issuer of the license you can confirm license details on this page.
To access the Vivid Trace license information and management page, use the following procedure.
- As a Jira administrator, navigate to the "Manage apps" group of Jira Administration.
- Access the Vivid and Partner-issued license information page by selecting "License and support" in the "Vivid Trace" menu section.
Definitive technical information about the version of the Vivid Trace software installed in your Jira system.
Direct access to various administrative resources.
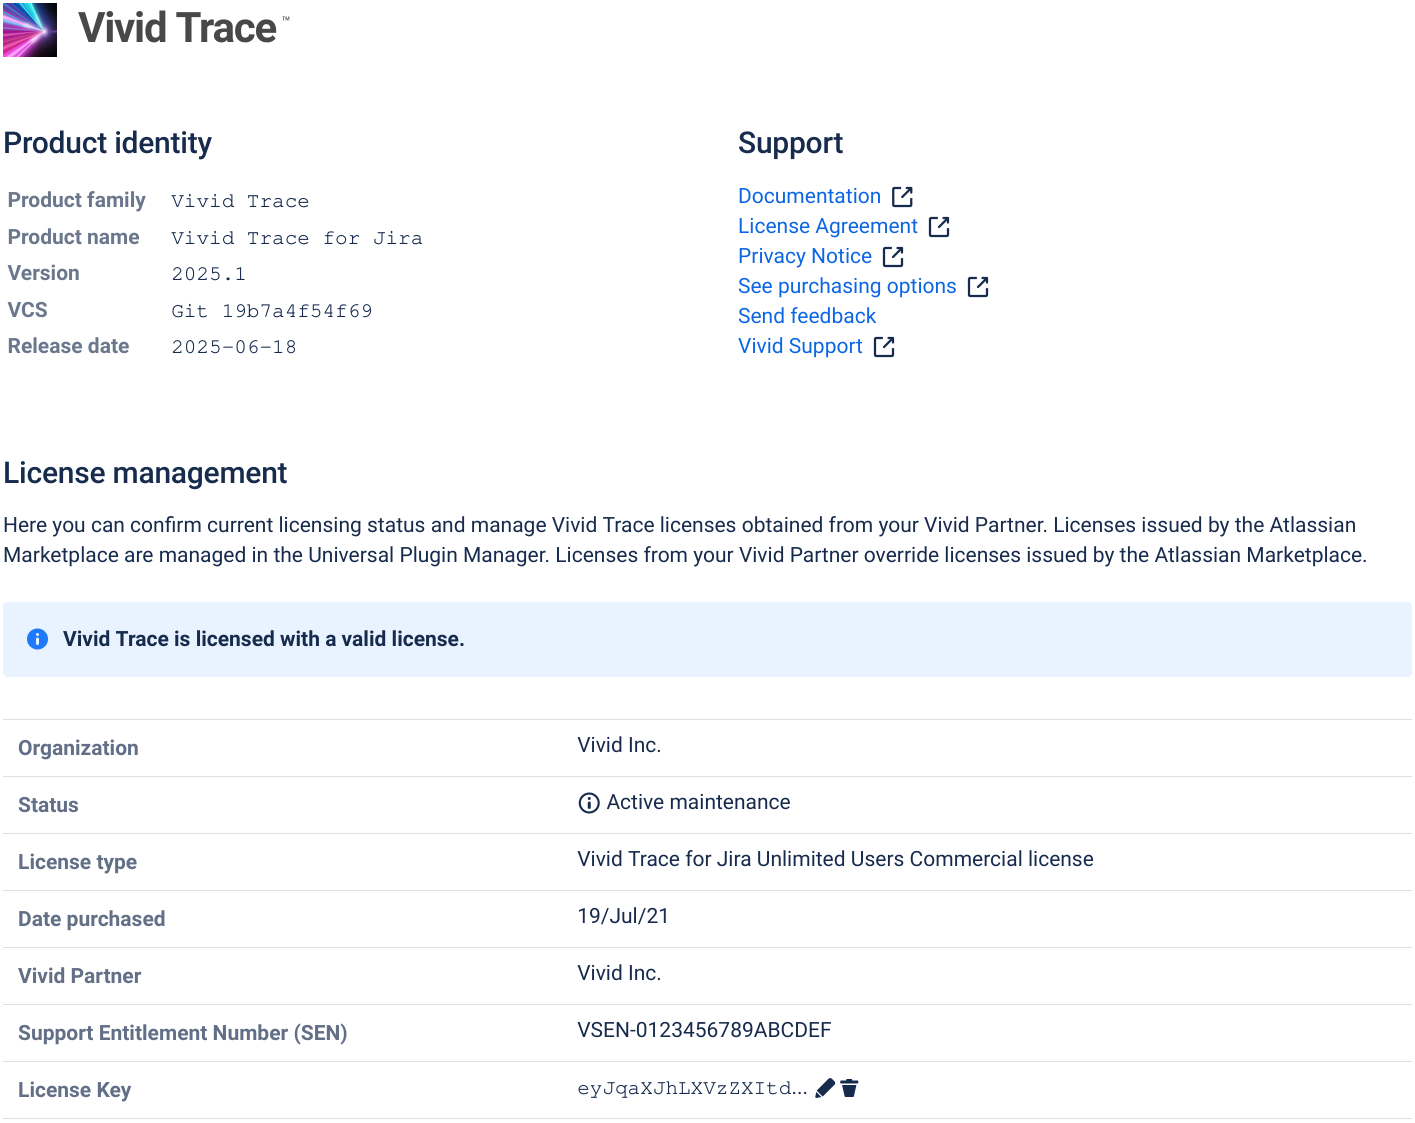
Diagnostic summary of add-on licensing status.
Manage the license key for licenses issued by Vivid and Vivid Partners.
| Organization | The end-user organization licensed to use the Vivid Trace add-on software. |
|---|---|
| Status | Summarizes the license validity and maintenance period. Also indicates approaching and recent changes to licensing status. |
| License type | Indicates the applicable add-on product and user tier of the license. |
| Date purchased | Date that the license was purchased or issued. |
| Issuer | Name of the issuer from whom the license was obtained: Vivid, a Vivid Partner, or the Atlassian Marketplace. |
| Support Entitlement Number (SEN) | In the case of a Vivid or Vivid Partner-issued license, displays a VSEN. In the case of an Atlassian Marketplace-issued license, displays a SEN. Please provide this number when contacting Vivid Support or your Vivid Partner. |
| License Key | Apply, update, or remove license keys supplied by your Vivid Partner. |
Managing a License Issued by the Atlassian Marketplace
If your license is issued by the Atlassian Marketplace, then this section applies to you.
Licenses issued by the Atlassian Marketplace are managed in the Universal Plugin Manager by accessing the Vivid Trace add-on entry using the same management patterns as other paid add-ons available in the Marketplace. For general information, refer to How to Update Your Add-on License in the Jira documentation.
Configuring System-Level Settings
The Vivid Trace add-on can be configured from within Jira's administration system. Use the following procedure to view the configuration settings.
- As a Jira administrator, navigate to the "Manage apps" group of Jira Administration.
- Access the add-on configuration page by clicking "System-level settings" in the "Vivid Trace" menu section.
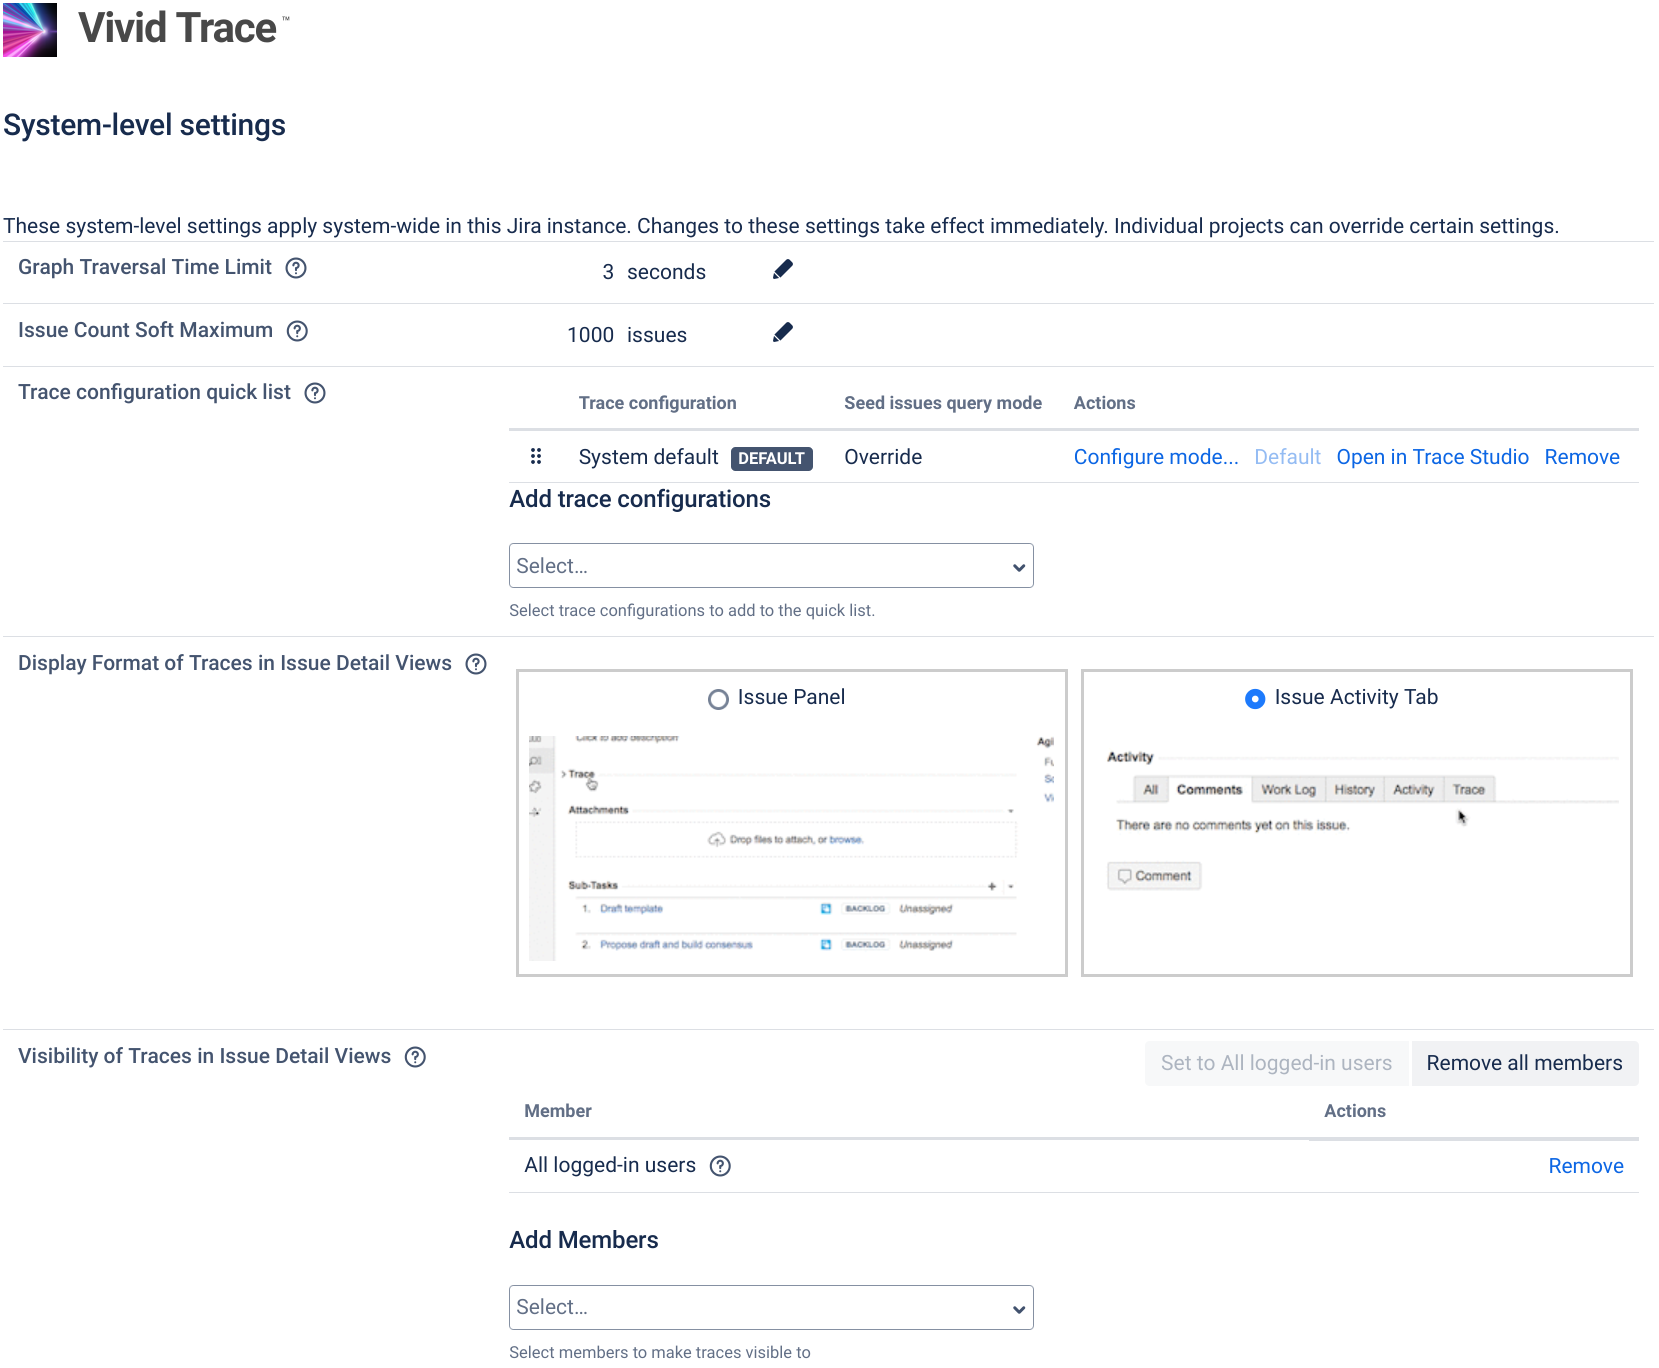
Here you can change system-level settings or reset them to factory defaults. Settings made here apply as default settings to all projects, but projects are individually able to override certain settings.
Pay heed to any errors and warning messages that appear in the system-level settings page. These messages will indicate conditions where add-on functionality is degraded or disabled, and need to be addressed before full functionality can be restored.
The following subsections explain Vivid Trace's configurable system-level settings.
Graph Traversal Time Limit
This is an advanced setting. If you are not certain that you understand the potentially deleterious effects of adjusting this setting, we recommend leaving this setting at its default value.
The Graph Traversal Time Limit is an execution guard that terminates long-running queries in order to cap the processing load of your Jira server system. It functions by limiting the amount of wall-clock time Jira spends traversing and accumulating information on each issue relation graph query, no matter how idle or busy Jira is. If issue relation graphs take longer than desirable to appear or results are being truncated more frequently than desirable, you can adjust the graph traversal time limit. Reducing the time limit increases the likelihood that issue relation graphs will be truncated, accompanied by warning VTW-15.
Warning message VTW-15 that accompanies issue relation graphs when processing was abruptly ended due to being capped by the Graph Traversal Time Limit.
Issue Count Soft Maximum
This is an advanced setting. If you are not certain that you understand the potentially deleterious effects of adjusting this setting, we recommend leaving this setting at its default value.
The Issue Count Soft Maximum is a breaker-switch that limits the number of issues fetched and displayed in individual issue relation graphs, balancing available compute power with the need to display issue relation graphs in their entirety. This setting takes effect immediately whenever updated and affects all projects. Graphs truncated due to this limit are accompanied by warning VTW-6.
Warning message VTW-6 that accompanies issue relation graphs when the quantity of issues displayed in the graph has been limited to the Issue Count Soft Maximum.
Technically, issue relation graph computation resource utilization increases in proportion to the connectedness of issues. Jira server infrastructure is used to compute issue relation graphs, and web browsers are used to lay out and display the graphs. Given this combination of quantity of issues involved, compute power, and frequency of use, if you have a need to reduce computational resource intensiveness or are finding that issue relation graphs are being unacceptably truncated, the Issue Count Soft Maximum can be adjusted.
Reducing the soft maximum increases the likelihood that issue link graphs will be truncated, presenting misleading and inconsistent information liable to negatively impact your organization's decision-making processes. Extreme limits, such as 20, might nullify the value of issue relation graphs altogether. For these reasons, it may be wise to deem reducing the soft maximum as an interim solution.
Indications that the Issue Count Soft Maximum may need to be decreased:
- Computation becomes unacceptably resource intensive on your Jira server infrastructure.
- Web browser performance drops to unacceptable levels when displaying issue relation graphs. Possibly attributable to lesser computing resources (slower processors, constrained RAM, older software).
Solutions that address the root cause and enable the Issue Count Soft Maximum setting to be restored include:
- Investigating the need for issue relation graphs of such magnitudes. For example, changing issue relation graph settings in certain projects to trim down issue relation graphs but still be effective in their use cases (possibly even improving signal-to-noise), and building awareness of the project settings feature among users.
- Using a faster web browser or upgrading its hardware.
- Scaling up the computational resources of the Jira server infrastructure.
The Issue Count Soft Maximum may need to be increased if graphs are being unacceptably truncated. Increasing this setting can potentially cause increased server utilization.
Trace configuration quick list
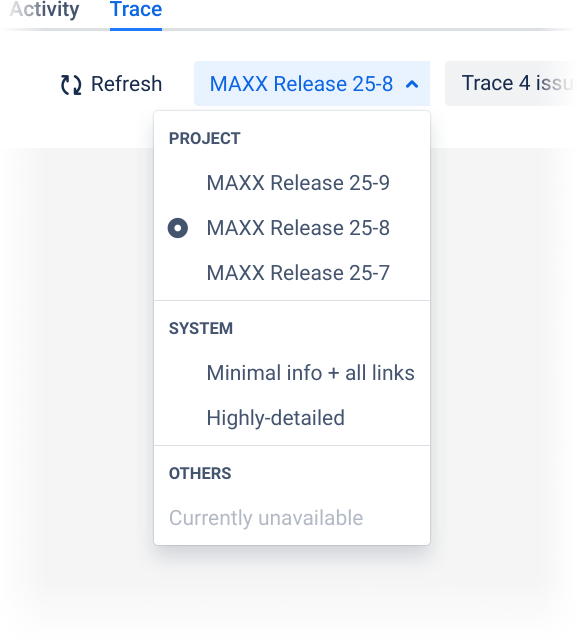
Contextual trace graphs appearing on project pages and issue details pages are generated using trace configurations. A menu of trace configurations accompanies contextual traces; this menu is the quick list and the active contextual trace configuration is chosen from this list. When the page is first loaded, one of the trace configuration entries in the quick list menu is chosen as the default and is used to generate the initial trace. At the viewer's pleasure, they can select a different trace configuration from the quick list to change the tracing criteria. Viewers may wish to change the trace in pursuit of gaining a different perspective or gathering information relevant to their particular role; the quick list is intended to support these aims. The quick list is structured into three sections:
- Trace configuration entries suggested by the current project, listed in the "Project" section of the menu. These entries are configured in each project, curated by the respective project administrators.
- Entries configured at the system level, here, appear in the "System" section of the menu, and are present in all quick lists across the entire Jira system. These entries are configured by Jira administrators.
- Any and all other trace configurations that the user can access, in the "Others" menu section.
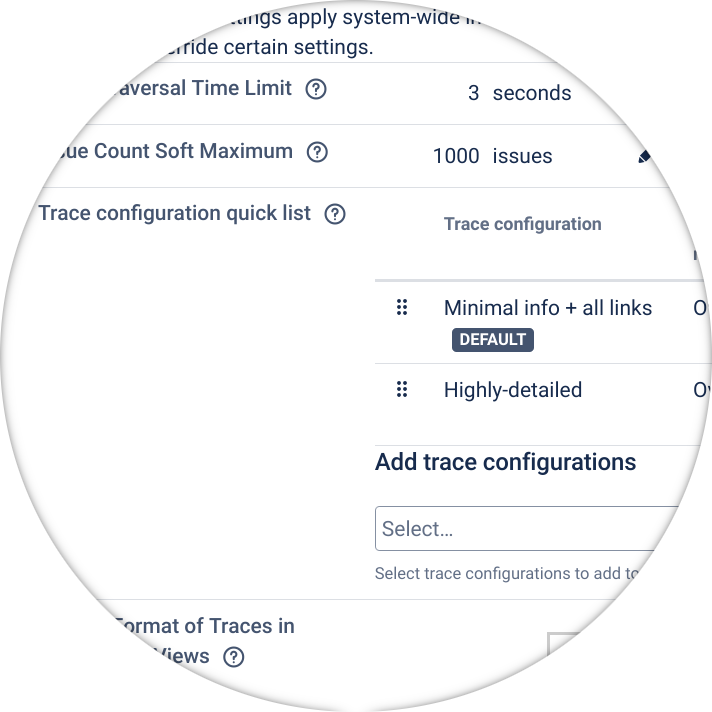
The system-level quick list entries appear in the "System" section of the quick list. Here you can add, remove, and re-order system entries and set the default entry. The default project entry, if present, overrides the default system entry.
This system-level setting populates the "System" portion of the quick list menu on all contextual trace graphs throughout your Jira instance. You can choose which trace configurations are offered to viewers by adding, removing, and re-ordering these entries and specifying the default entry. By default, this system-level setting is configured as a single trace configuration named "System default". You can completely remove all entries, in which case the "System" portion of the quick list menu will disappear altogether. If both project- and system-level quick list settings are empty, Vivid Trace will fall back to a minimal, last-resort trace configuration.
This setting and its "System" portion of the menu cannot be overridden by projects or users and is available to all viewers, subject to access permissions each user has on the respective trace configurations. Individual trace configurations can be created, designed, and edited in the Trace Studio. You can manage the full list of trace configurations at the system-level in Trace configuration management.
The default quick list entry will be determined and automatically chosen when a viewer first views a contextual trace. The default quick list entry set in a project, if any, will override the system-level default set here. From this perspective, the default system-level quick list setting can be though of as a general fall-back setting for when projects don't provide their own.
Good practice: In the interest of not overwhelming viewers with choice, provide a few generally-useful, judiciously-chosen selections at the system level. You might even opt to leave this setting at its default value of "System default". Individual projects can always provide their own quick list selections that cleverly match their particular needs.
Seed issues query mode
When viewing a contextual trace graph in a project or on an issue details page, the active quick list entry is combined with the viewing context (project, issue) plus a seed issues query mode to calculate the trace configuration used to conduct the trace. The seed issues JQL query from the selected trace configuration can be used as-is, for example project = MAXX, but in the context of an issue details page for issue ABC-123, the resulting contextual trace graph would show issues for the MAXX project and might not show issue ABC-123 at all. Normally this is not what viewers need or expect from a contextual graph. When a trace configuration is added to the quick list, the default mode settings is for its seed issues JQL query to be overwritten to match the context. Continuing the example, the query saved in the trace configuration project = MAXX would be overwritten with a query suitable for the context, such as key = ABC-123 for an issue details page or project = ABC for the project-level contextual trace. The other settings in the trace configuration remain intact and are used as-is. This way of overwriting the seed issues JQL query in the trace configuration to suit the context is the "seed issues query mode" and is the default behavior of Vivid Trace, but this behavior is configurable by changing the mode. For more information, see the mode setting dialog for descriptions of each mode and their effective settings.
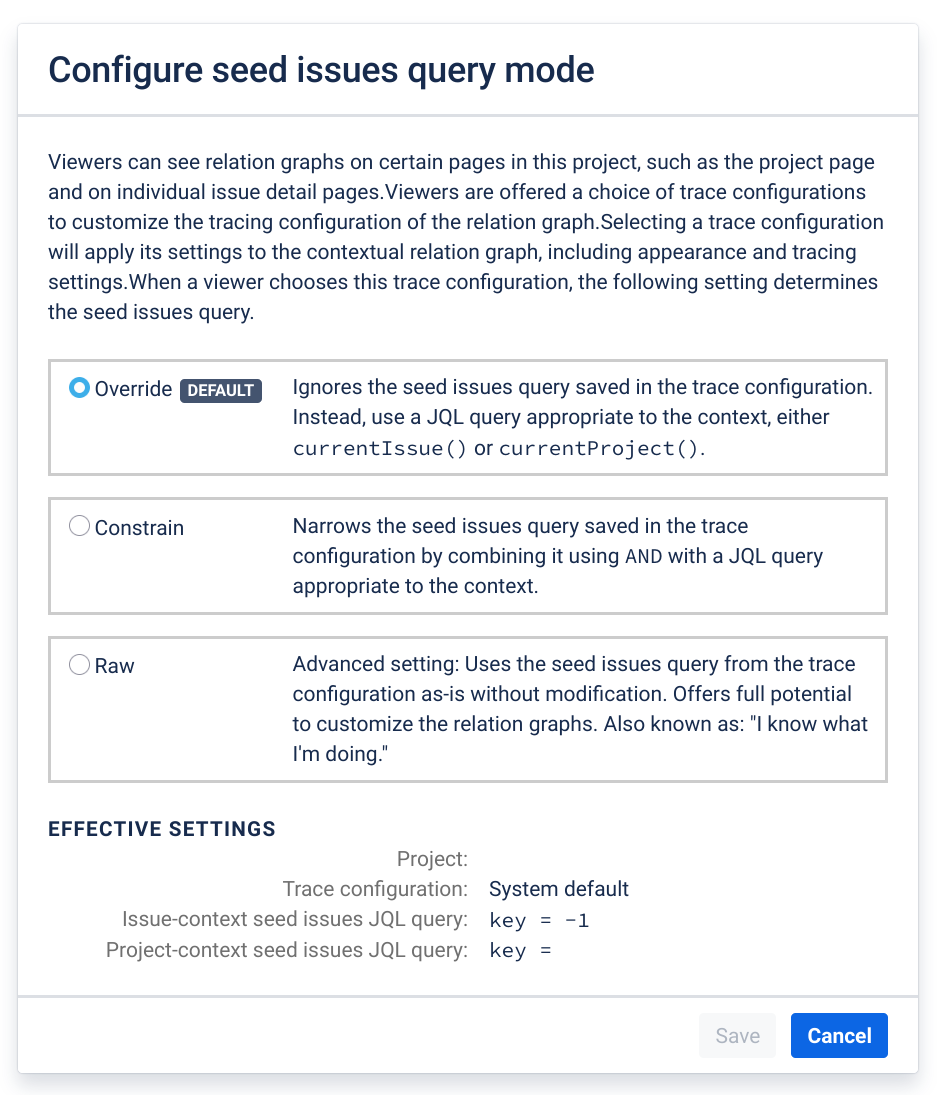
Adjust the seed issues query mode to customize from which seed issues the trace will start when this trace configuration is selected from the quick list on contextual traces.
Display Format of Traces in Issue Detail Views
This system-level default setting controls how traces are displayed in issue detail views, either as an issue panel (the default) or an issue activity tab. Setting this to Issue Activity Tab will have the effect of still displaying traces to viewers (according to Visibility of Traces in Issue Detail Views, but only when each user has intentionally switched the activity tab to Trace. Changing this setting will immediately apply the change across all projects that do not override this setting.
Visibility of Traces in Issue Detail Views
This system-level default setting controls to whom contextual traces are made visible in issue detail views. By default, contextual traces are visible to All logged-in users, but for system performance or other reasons you may wish to curtail this list here at the site level to a more discriminating list of members. As an example, you could make a best-guess approximation and set default visibility to just (by example) the Developers project role and the Support Desk group. These members would then see contextual traces in issue detail views and everyone else won't. Another deployment configuration option is to remove all members from the list, leaving it empty, and rely on individual projects to determine their own settings. Changing this setting will immediately apply the change across all projects that do not override this setting.
Managing Trace Configurations
This interface allows Jira administrators to list, examine details of, and manage all trace configurations stored on the Jira instance. Use the following procedure to access a particular trace configuration:
- As a Jira administrator, navigate to the "Manage apps" group of Jira Administration.
- Access the trace configuration management page by clicking or tapping "Trace configurations" in the "Vivid Trace" menu section.
- Click or tap a non-link portion of the trace configuration entry of interest to reveal full details.
Inspect a trace configuration's metadata or change its name.
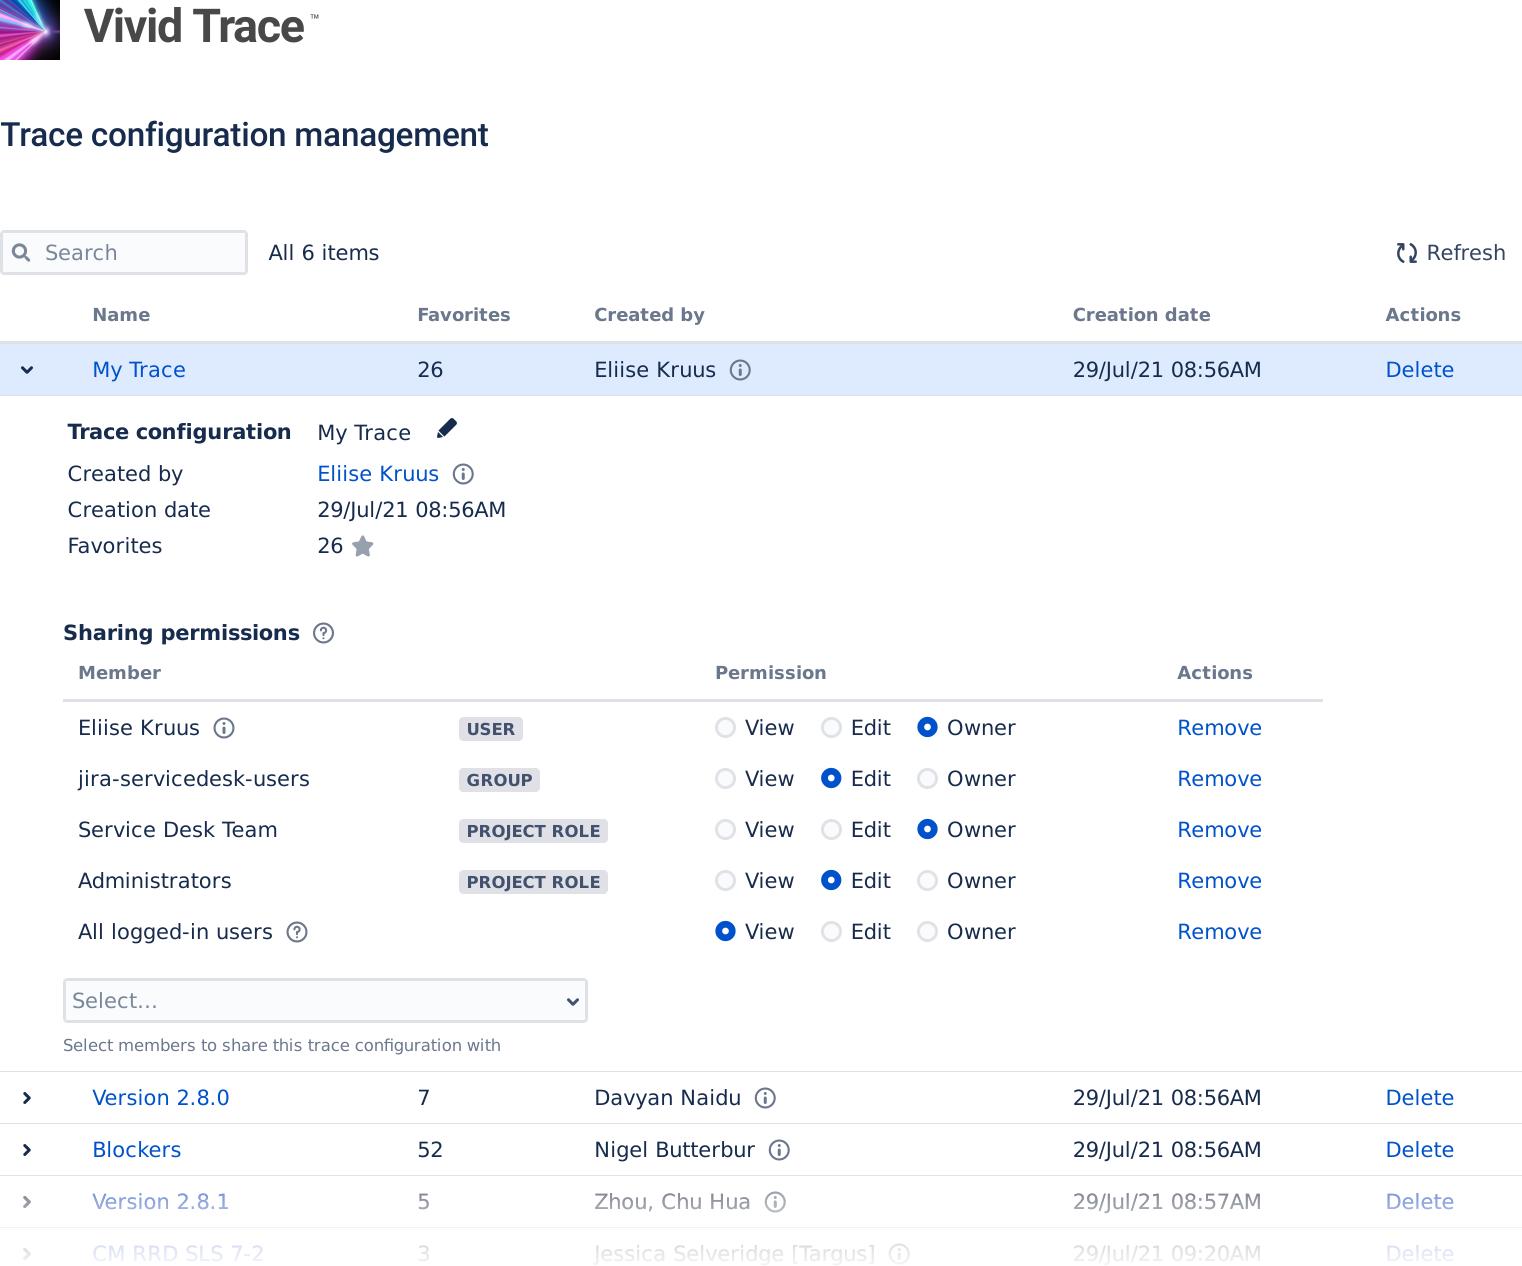
Comprehensive list of all trace configurations in your Jira system.
Modify sharing permissions, useful for surgically re-establishing ownership or revivifying older traces.
Administration of Vivid Trace for Confluence Add-on Software
This section concerns administration of the Vivid Trace for Confluence add-on software:
Requirements
- Supports Atlassian Confluence Data Center versions noted in Specifications.
- Confluence must have at least one Application Link established to one or more Jira instances.
- The Jira system from which trace information is drawn upon must have a supported version of Vivid Trace for Jira installed and correctly licensed.
Installation and Support
From an administrative perspective, Vivid Trace for Confluence is different from the Jira variant:
- The software is named "Vivid Trace for Confluence" and is packaged as an add-on for Confluence.
- This Confluence add-on is free for all current Vivid Trace customers to use; no further licensing is involved.
- This Confluence add-on requires the host Confluence system to have Application Links established to one or more Jira instances before its features can be utilized.
- With this Confluence add-on deployed, Confluence will experience at most a negligible increase in processing load or data storage requirements.
Search for vivid trace in the Atlassian Marketplace.
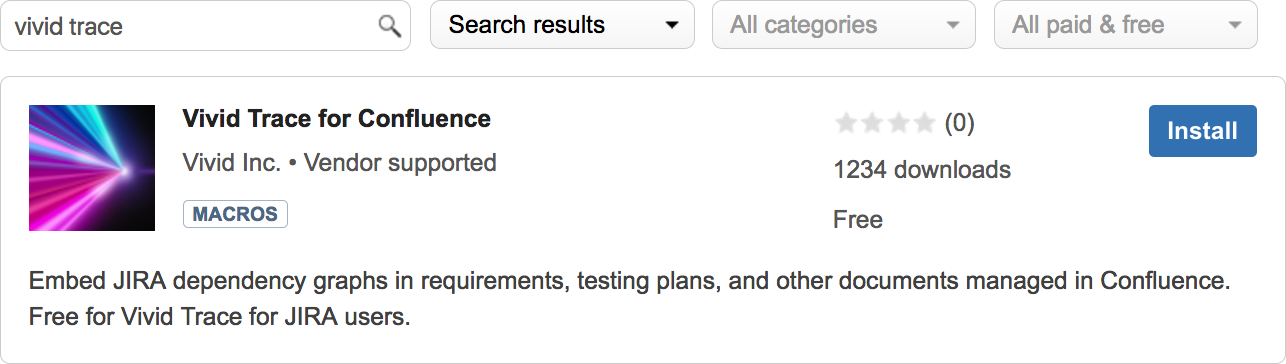
Install Vivid Trace for Confluence by selecting "Install" and following the directions.
Installation, updates, and uninstallation of the Vivid Trace for Confluence add-on software follows the same pattern as for Vivid Trace for Jira.
See Getting Support for information on how to obtain support for Vivid Trace for Confluence.
Establishing an Application Link between Confluence and Jira
The Trace macro in Confluence accesses trace information from Vivid Trace for Jira through Application Links. If you don't have any application links to Jira configured, the Trace macro will prompt administrator users to begin the configuration process or indicate the necessity to non-administrator users.
Use the following procedure to create an application link between Confluence and Jira. You can also start the process from the Jira side; the process and the result will be essentially identical.
- Log in to Confluence with System Administrator permissions.
- Navigate to the "Application Links" administration page within Confluence.
- Enter the base URL of a Jira instance and then click "Create new link".
- Continue the configuration process to establish the application link to Jira.
Additional Languages
Vivid Trace provides language localizations that complement the localizations bundled with your Jira and Confluence systems. Refer to the Specifications for the full list of language localizations in Vivid Trace and their degrees of completeness.
Users can personalise their accounts to use Jira and Confluence in their preferred language. But, without adding language packs, users who have set their preferred language to a language available in Vivid Trace not bundled with Jira or Confluence might see the non-Vivid Trace parts of Jira in a different and potentially unintelligible language. To have the host platform accommodate your language needs, take the following actions:
Add Jira and Confluence Language Packs: Install additional language packs from the Atlassian Marketplace.
Configure Jira's Default Language: Set Jira's default language setting to a sensible choice of site-wide fall-back language.
Inform Users About the Account Language Setting: Inform users about the procedure for setting their preferred language.
Note that other add-ons may or may not offer localizations for your language choices.
Updating the Add-On
If a newer version of the Vivid Trace add-on is available on the Atlassian Marketplace, the add-on management user interface will highlight that fact and feature an "Update" button that allows you to perform the add-on update process directly in your Jira system. After the add-on update process finishes and you re-index Jira, the new release will be immediately available to all users.
Although the process of updating the add-on itself is a matter of pressing the "Update" button and re-indexing Jira, Vivid strongly advises that you first carefully confirm the accompanying Release Notes to identify any issues that might impact your organization. If the proposed update to Vivid Trace is several releases newer than your installed version, please take care to also confirm the Release Notes of all intervening versions.
To update the Vivid Trace add-on, use the following procedure.
- Access the Vivid Trace add-on entry in Jira's add-on management page.
- Identify the currently installed version, the available version, and the applicable Release Notes.
- When you are ready, click the entry's Update button. The available version of Vivid Trace begins to download. Observe the add-on download and update process through to successful completion.
- Re-index Jira. If you wish to perform the re-index without disrupting Jira availability, choose Background Indexing.
After completing the update procedure, briefly confirm correct operation of Vivid Trace and your Jira system. If you experience a problem resulting from the update that you cannot resolve on your own, please contact Vivid Support or your Find a Vivid Partner. In the event interim measures need to be taken for emergency situations until a satisfactory resolution can be achieved, options include disabling the add-on, and re-installing the older, known-good version of the add-on ("downgrading").
Uninstalling the Add-On
If you no longer need the benefits of Vivid Trace, use the following procedure to uninstall the Vivid Trace add-on software.
- Access the Vivid Trace add-on entry in Jira's or Confluence's add-on management page.
- Click the entry's Uninstall button and follow the directions to complete the add-on uninstall process.
After uninstallation, your Vivid Trace data will remain in Jira and Confluence, and will be available should the add-on be re-installed in the future. Vivid Trace can be easily reinstalled at a later time by following the installation instructions in this document. For more information, refer to Uninstalling add-ons in the Jira documentation.
Backup and Restore
For complete backup and recovery of the Vivid Trace add-on software, the only aspect that needs to be subjected to your backup procedures is the add-on data, which is stored in Jira's database. Jira supports two methods for backing up database contents: Native database backup tools, and Jira's XML backup utility. Both of these methods backup and restore the add-on's data along with Jira's own data. If you already have Jira backup procedures in place using either of these supported methods, then Vivid Trace's data will automatically be folded into Jira's own backups, with no additional work on your behalf.
Technically, the add-on stores all of its data using Jira's ActiveObjects which in turn stores data in Jira's SQL database system. Because Jira's backup and restore system automatically targets add-on data in the ActiveObjects sub-system, all Vivid Trace add-on data is written as a part of Jira's own process of backing up Jira data to a backup file, and is automatically restored with Jira is restored from such a backup file. You can confirm the presence of add-on data in the backup files by scanning the unarchived contents for strings such as (case-insensitive) vivid trace and/or vivid.trace. You can confirm add-on data in a restored system by connecting to Jira's SQL database system and inspecting add-on data tables whose names are prefixed with the string AO_FF0AC4_, and also by asking individual users whether their data is as they expect.
Supplementary Topics
Vivid Trace's Custom Field
Vivid Trace utilizes a custom field. This field is locked to prevent it from being changed.

Correct configuration of Vivid Trace's custom field. If this field is at all changed, Vivid Trace will malfunction, and in catastrophic cases, appear to function correctly while delivering misinformation to users. If in the event this field needs to be restored to its shipping configuration, you can either disable then re-enable or uninstall then re-install Vivid Trace.
Limitations and Security Considerations
Automatic Refresh of Issue Relation Graphs: Graphs do not automatically refresh whenever certain issue fields are manipulated using the inline editing feature, due to lack of on-page update notification support in Jira.
Changing the System Clock: The Graph Traversal Time Limit mechanism depends upon the notion of the current time as supplied by the operating system. Changing the system clock by significant amounts may affect all in-flight graph requests that Vivid Trace is processing at the moment of change. Those requests might run much longer (if the clock is set backwards) or be abruptly ended (if the clock is set forwards).
Downgrading the Vivid Trace Add-on: Vivid Trace is backward compatible with add-on data created by prior releases, but is not forward compatible with add-on data created by newer releases. Re-installing Vivid Trace with an older release ("downgrading") may lead to undefined & unsupported behavior, particularly with features that utilize add-on data.
Jira Issue Linking and Parent/Sub-task Features: It is possible for Jira to store issue links and sub-task issue data even while the respective features are disabled. Vivid Trace's behavior is unspecified when used in conjunction with such disabled features.
Jira Project Key Format: The JQL functions in Vivid Trace are designed to recognize project keys that conform to Jira's customisable supported project key format. If a given key is not recognized, investigate whether it and your Jira system's project key format setting conform to Jira's supported project key format. If the project key is found to be non-conforming, it will need to be corrected before the JQL functions can recognize it.
Renaming Jira Project Keys: In the event a project key is changed in Jira, the corresponding Vivid Trace project configuration will follow the change, associating with both the old and new project keys. Note however that although Jira is able to reimport a Jira project under an updated key and thereby lose notion of any prior keys, how the Vivid Trace project configuration will associate is unspecified. Trace configurations that specify projects by their project keys rather than ID will not be automatically updated to reflect project key renamings.
Display width and page overflow of traces embedded in Confluence: Embedded trace graphs do not resize themselves to fit within their context such as on an issue details page in Jira; instead they are displayed at their natural height and width. Graphs wider than the page / web browser view will overflow.
"Jira Issues" Confluence Macro and relations() JQL function: A defect in the Confluence macro Jira Issues prevents the relations() JQL function arguments from being anything other than a single Jira issue key.
Sharing permissions of trace configurations embedded in Confluence pages: You can insert any trace configuration that you have access to at that time. Thereafter, who can see the trace and what they can see in the trace are open to change whenever sharing permissions or issue security settings are changed.
Getting Support
To view support options, visit Vivid Support. If you purchased your license from a Vivid Partner, you can also obtain support from them by contacting them directly. The terms of support are fully detailed at Vivid Support.